
 Why Mobile Tyre Replacement is the Future of Car Maintenance
  The Real Cost of Anime Car Wraps: What You Need to Know Before Going Full Itasha
  The Importance of Quiet Generators for Peaceful Sleep: Featuring the Jackery Solar Generator 2000 Plus
  Why WEX Motorpass Is the Smart Choice for Business Fuel Management
  Top Choice for 4WD and Overlanding Rentals in Bozeman
  How Car Window Tinting Enhances Privacy and Protection on the Road
  Certified Preowned Cars: Are They Worth It?
  Apps That Help Diagnose Car Problems Like a Mechanic
  How to Track Fuel Efficiency and Expenses Using Smart Apps
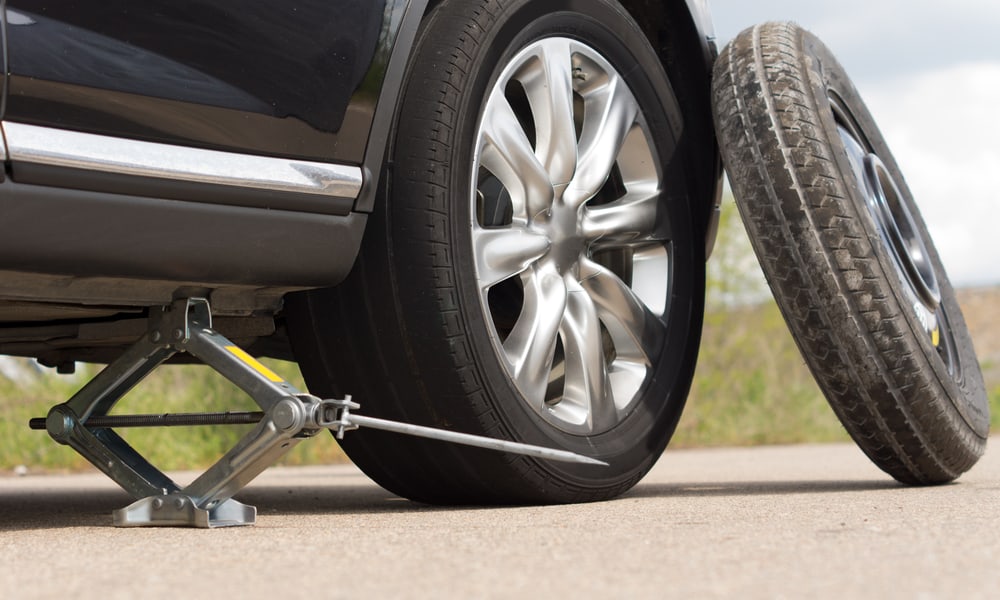
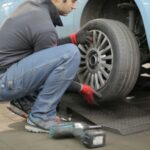
Flat tires are one of the most common and frustrating emergencies drivers face. With many modern cars no longer including spare tires, tire repair kits have become a crucial tool for handling such situations. Understanding how to use a tire repair kit can save you from being stranded and help you safely reach a repair shop. This step-by-step guide will walk you through the process, ensuring you’re prepared for any roadside tire emergency.
Understanding Tire Repair Kits
A tire repair kit is a compact, lightweight solution for temporarily fixing flat tires. It is designed to seal minor punctures in the tread area and reinflate the tire so you can continue driving. There are two main types of kits: sealant-based kits and plug kits. Sealant kits use a chemical sealant to patch small holes, while plug kits involve inserting a rubber plug into the puncture. Each has its strengths and limitations, and understanding the components of your specific kit is essential.
Most tire repair kits include the following:
- Sealant canister or rubber plugs
- Air compressor or inflation device
- Reamer and insertion tools (for plug kits)
- Tubes or hoses for connection
- Gloves for safety
- Instructions specific to the kit
Tire repair kits are designed for specific situations. They are effective for punctures in the tread area but are not suitable for larger holes or sidewall damage. Always assess the damage carefully before attempting a repair.
Preparing to Use a Tire Repair Kit
Before starting the repair process, follow these safety precautions to ensure your well-being and the effectiveness of the repair:
- Park Safely: Stop your car on a flat, stable surface away from traffic. Turn on your hazard lights and use reflective markers if you have them.
- Gather Your Tools: Locate your tire repair kit and ensure all components are present. Additional tools like gloves, a tire pressure gauge, and a portable light can be helpful.
- Inspect the Damage: Identify the source of the puncture. If a foreign object like a nail or screw is embedded in the tire, leave it in place until you’re ready to repair.
Step-by-Step Guide to Using a Tire Repair Kit
Using a Sealant-Based Kit
- Remove the Object: Use pliers to carefully pull out the object causing the puncture.
- Connect the Sealant: Attach the sealant canister to the valve stem of the flat tire, following the kit’s instructions.
- Inject the Sealant: Release the sealant into the tire by pressing or turning the canister as directed. Make sure the recommended amount is used.
- Reinflate the Tire: Attach the air compressor or inflator to the valve stem and inflate the tire to the manufacturer-recommended pressure. Use a tire pressure gauge to confirm accuracy.
- Check for Leaks: Observe the repaired area to ensure no air is escaping.
- Drive to Distribute Sealant: Drive for 2–4 miles at a moderate speed to allow the sealant to spread evenly and seal the puncture completely.
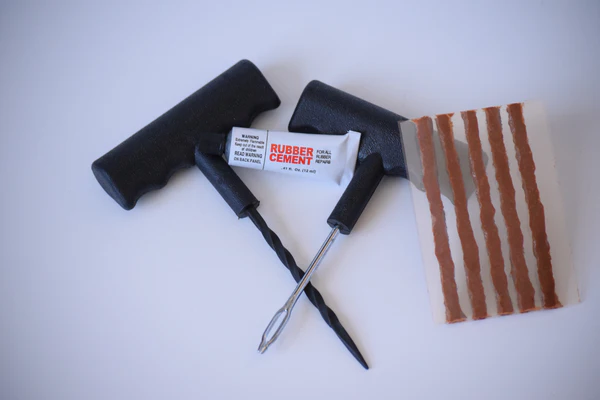
Using a Plug Kit
- Remove the Object: Pull out the foreign object using pliers.
- Prepare the Hole: Insert the reamer tool into the puncture and twist it to clean and enlarge the hole for the plug.
- Insert the Plug: Thread a rubber plug onto the insertion tool. Push the tool into the hole until only a small portion of the plug is visible.
- Seal the Plug: Pull the insertion tool out gently, leaving the plug in place.
- Trim Excess Material: Use scissors or a knife to cut off any excess plug sticking out of the tire.
- Reinflate the Tire: Inflate the tire using an air compressor and check the pressure to ensure it meets the recommended level.
- Check for Air Leaks: Inspect the plug for any signs of air escaping before driving.
Post-Repair Steps
After completing the repair, follow these important steps:
- Monitor Tire Pressure: Use a tire pressure gauge to ensure the tire remains at the correct pressure. Check periodically during your drive.
- Drive Cautiously: Repairs with a kit are temporary, so drive carefully to the nearest tire shop for a professional inspection and permanent repair.
- Seek Professional Assistance: A professional will assess the tire for hidden damage and recommend whether it needs to be repaired or replaced.
Common Mistakes to Avoid
- Using a Kit on Unrepairable Damage: Tire repair kits are ineffective for sidewall damage or large punctures. Attempting to use one in such cases could lead to further complications.
- Overusing Sealant: Excessive sealant can cause tire imbalance and may damage the tire’s internal structure.
- Driving Long Distances on Temporary Repairs: Temporary repairs are not meant for extended use. Replace or professionally repair the tire as soon as possible.
Additional Tips for Emergency Tire Repairs
- Keep Your Kit Up to Date: Regularly check the expiration date on sealants and ensure all components of the kit are functional.
- Carry Extra Tools: Portable air compressors, additional plugs, and a reliable tire pressure gauge can be lifesavers during emergencies.
- Practice Beforehand: Familiarize yourself with your kit’s components and practice using them in a controlled environment to reduce stress during an actual emergency.
Alternatives to Tire Repair Kits
If you’re not confident using a repair kit or prefer other options, consider the following:
- Run-Flat Tires: These allow you to drive short distances even after a puncture, reducing the need for immediate repairs.
- Roadside Assistance Services: Many drivers rely on professional services to handle emergencies.
- Carrying a Spare Tire: Investing in a spare tire can provide peace of mind, especially for long trips or remote driving.
Conclusion
Knowing how to use a tire repair kit is an invaluable skill for any driver. These kits are a quick, convenient solution for minor tire punctures, but they require proper usage and understanding. By following this guide, you can confidently handle roadside tire emergencies and ensure your safety. Always remember that tire repairs with a kit are temporary, and professional inspection is essential for long-term reliability. Stay prepared, stay safe, and drive with confidence.